
In this tutorial you will learn how to create a Bluetooth device using some of the basic tools in found in Adobe Illustrator. To build this great looking device you will be using Round Corners, Offset Path and Pathfinder.
Step 1
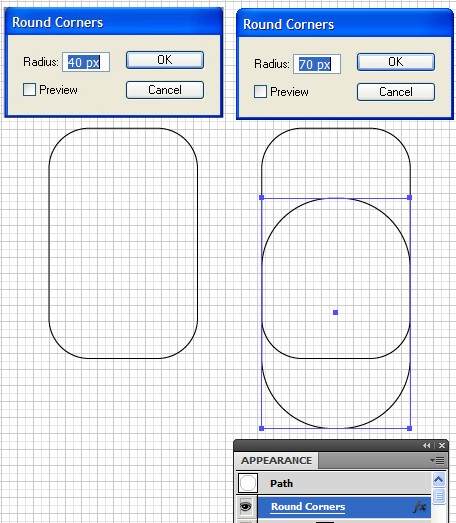
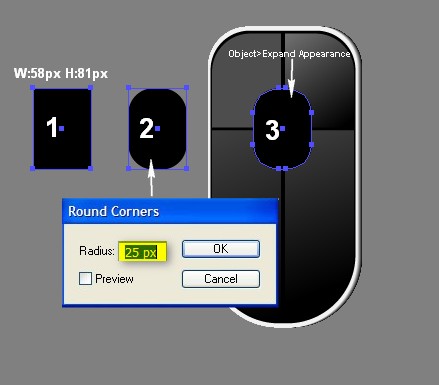
Create a 148px by 230px rectangle and go to Effect > Stylize > Round Corners, set the Radius to: 40px, click OK. Copy and Paste the rounded rectangle using Control + C followed by Control + F. Move the copy a few pixels down, open the Appearance panel, click on the Round Corners layer and change the Radius to: 70px, have a look at the picture below for reference.
Step 2
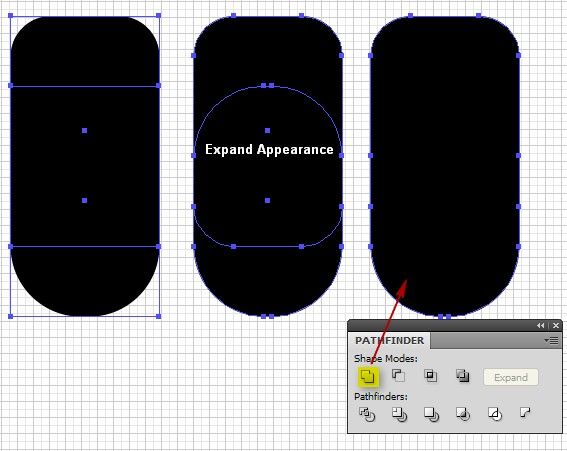
Select both shapes and go to Object > Expand Appearance, then open the Pathfinder panel, click on the Unite button and fill the new shape with black.
Step 3
Copy the shape from the previous step using Control + C followed by Control + F, move the copy 7-8 pixels to the left, change the color to white and go to Object > Path > Offset Path, set the Offset to: 2,5px, click OK. Change the new shape’s color to black, then select both back shapes and go to Object > Blend > Make (Alt + Control + B).

Step 4
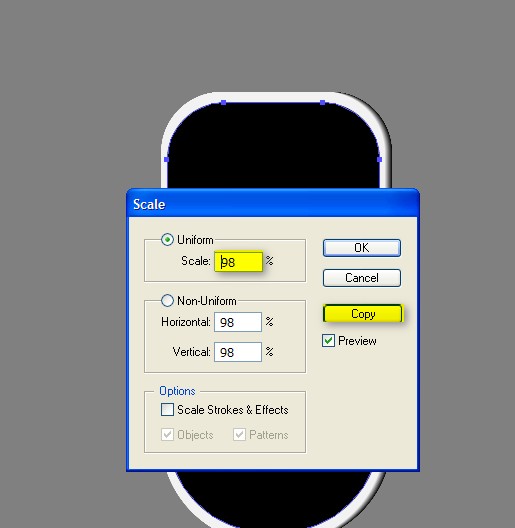
Select the shape that appeared on-top of the other shapes and go to Object > Transform > Scale, enter the following settings: Uniform, Scale: 98% and click the Copy button.
Step 5
Create a rectangle with a width of 4px and a height taller than the shape that appeared in the previous step. Center the rectangle, then create another rectangle with a height of 3px and wider than the shape that appeared in the previous step, position the rectangles as shown in the picture below. Select the two rectangles you just created, open the Pathfinder panel, click on the Add To Shape Area button, then select the shape from the previous step and the shape that just appeared, open the Pathfinder panel and click on the Minus Front button.

Step 6
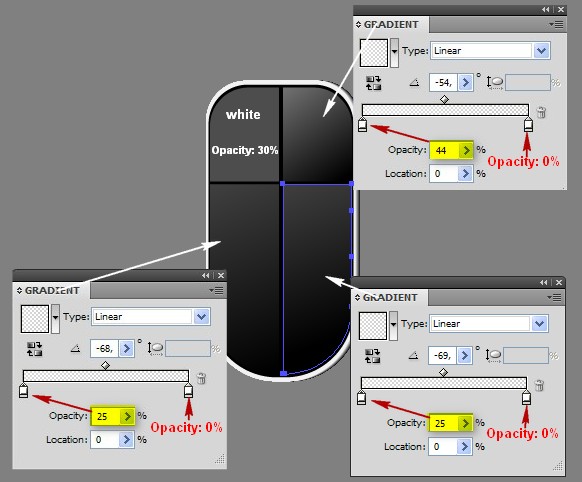
Select the group with the four shapes that appeared in the previous step, copy it using Control + C followed by Control + F and fill the shapes with a Linear Gradient as shown in the picture below.
Step 7
Create a black 58px by 81px rectangle and go to Effect > Stylize > Round Corners, set the Radius to: 25px, click OK and go to Object > Expand Appearance and move the shape into position as shown in the picture below.
Step 8
With the shape from the previous step still selected, go to Object > Path> Offset Path, set the Offset to: -2px, click OK, then with the Mesh tool (U), click on the inner side of the shape in different places and correct the colors as shown in the picture below.

Step 9
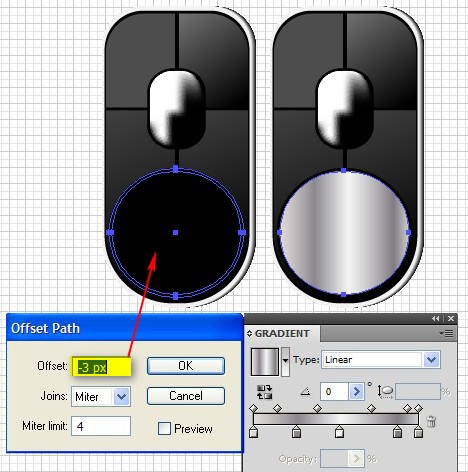
Create black 135px by 130px ellipse in a position as shown in the example below, then go to Object > Path > Offset Path, set the Offset to: -3px, click OK and fill the shape with a Linear Gradient as shown.
Step 10
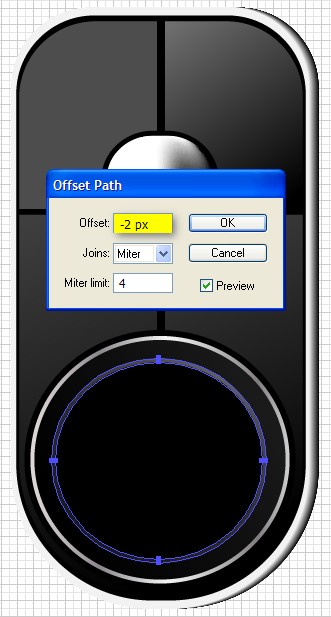
With the ellipse still selected, go to Object > Path > Offset Path, set the Offset to: -2px, click OK and fill the shape with a Linear Gradient with colors from black to R:26 G:26 B:26, Angle: 32 degrees.

Step 11
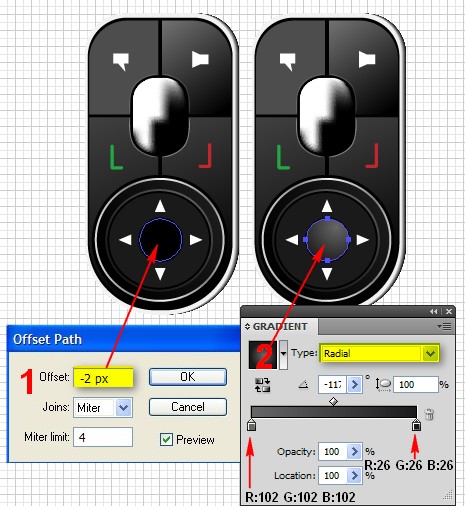
With the shape still selected, go to Object > Path > Offset Path, set the Offset to: -9px, click OK and fill it with a Radial Gradient with colors from R:102 G:102 B:102 to R:26 G:26 B:26.

Step 12
We need to use the same technique again, so with the shape from the previous step still selected, go to Object > Path > Offset Path, and set the Offset to: -2px, click OK and fill it with black.
Step 13
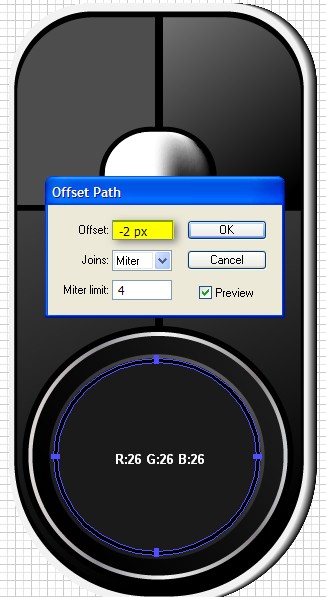
Apply an Offset to the shape from the previous step. To do this, select the shape, go to Object > Path > Offset Path, set the Offset to: -2px, click OK and fill it with R:26 G:26 B:26.
Step 14
With the Pen tool (P), add some shapes over the buttons, apply a 0,1px white Tapered Stroke, also add the necessary icons to the buttons, have a look at the picture below for reference.

Step 15
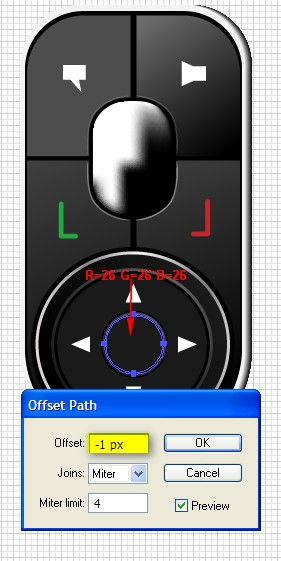
Create a black 45px by 45px circle in the center of the last ellipse and go to Object > Path > Offset Path, set the Offset to: -1px, click OK and fill it with a radial Gradient with colors from R:102 G:102 B:102 to R:26 G:26 B:26.
Step 16
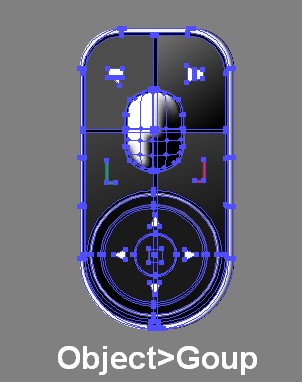
Apply a -1px Offset to the last circle and fill with R:26 G:26 B:26, after that select all shapes of the Bluetooth and group them by going to Object > Group.
Step 17
Now we will create the cover for the Bluetooth Create 3 rectangles with the Rectangle tool (M), the first one will be 144px by 121px, the second one 170px by 176px and the third one 177px by 75px, round the corners of the 3 rectangles with a Radius of: 12px. Move the rectangles into position, one over another, as shown below and go to Object > Expand Appearance. Open the Pathfinder panel and click on the Unite button, have a look at the picture below.

Step 18
With the shape from the previous step selected, fill it with a Linear Gradient with the colors R:66 G:66 B:66 to R:91 G:91 B:93.

Step 19
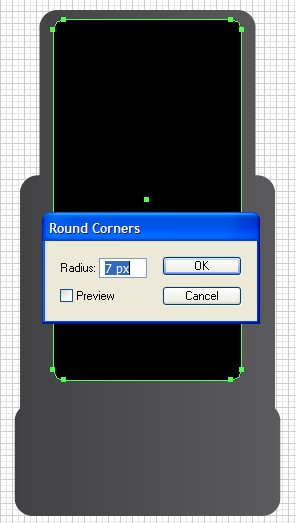
As shown below, create a black 125px by 240px rectangle over the previous shape and round the corners with a Radius of 7px.
Step 20
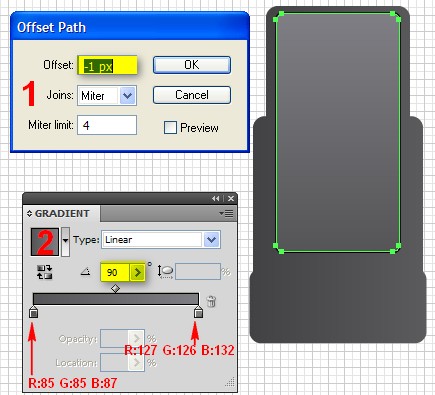
With the shape still selected, go to Object > Path > Offset Path, and set the Offset to: -1px, click OK and fill it with a Linear Gradient with colors from R:85 G:85 B:87 to R:127 G:126 B:132, Angle: 90.
Step 21
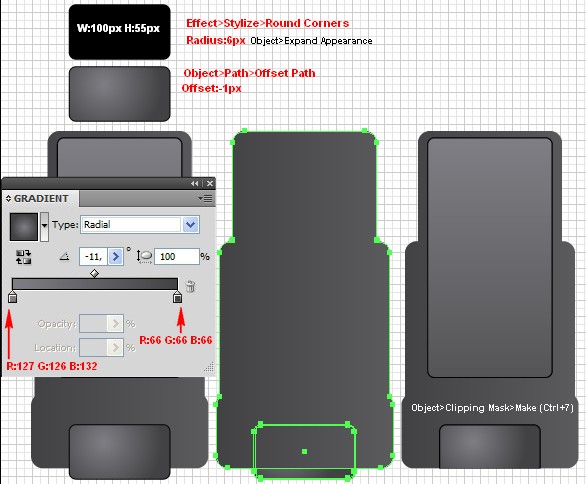
Create a black 100px by 55px rectangle, go to Effect > Stylize > Round Corners, and set the Radius to: 6px, straight after that go to Object > Expand Appearance and position the shape in the bottom part of the cover. With the shape still selected, go to Object > Path > Offset Path, and set the Offset to: -1px, click OK. Fill the resulting shape with a Radial Gradient with the colors R:127 G:126 B:132 to R:66 G:66 B:66. Select the first shape you created for the cover using Control + C followed by Control + F and move it over all others by going to Object > Arrange > Bring To Front. Select both the shapes you created earlier and the shape you moved over the others and go to Object > Clipping Mask > Make (Control + 7).
Step 22
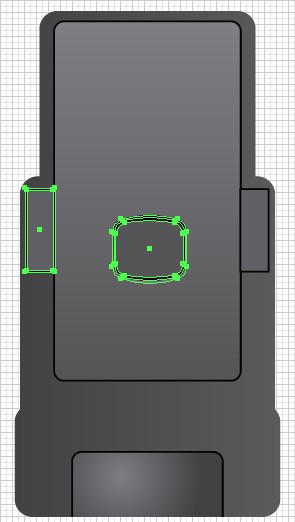
Using the same technique add the shapes shown below.
Step 23
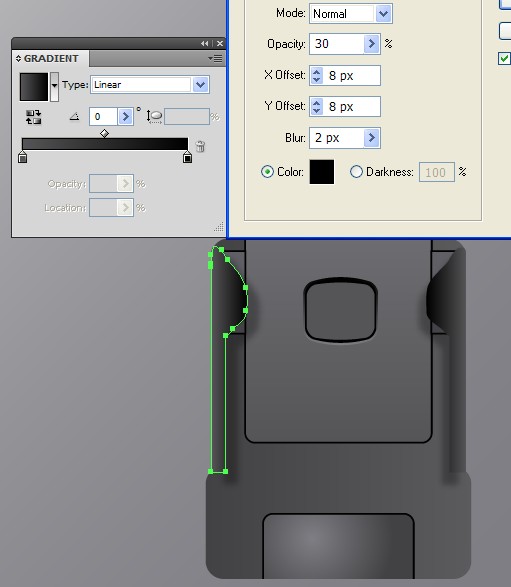
Create a shape in a position as shown in the picture below using the Pen tool (P), fill it with a Linear Gradient with colors from grey to black. Apply a Drop Shadow by going to Effect > Stylize > Drop Shadow and enter the following settings: Mode: Normal, Opacity: 30%, X Offset: 8px, Y Offset: 8px, Blur: 2px, click OK. Copy the shape using Control + C followed by Control + F, flip it horizontally and position it on the other side of the cover.
Step 24
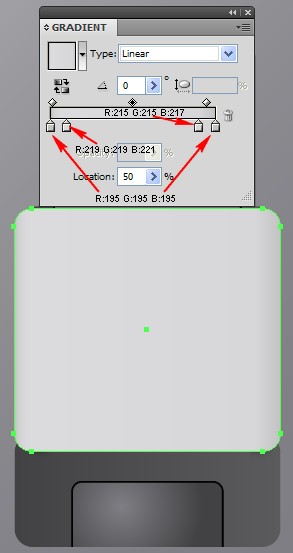
Create a 177px by 162px rectangle, fill it with Linear Gradient as shown in the picture below.
Step 25
With the shape still selected, send it behind all others by going to Object > Arrange > Send To Back.

Step 26
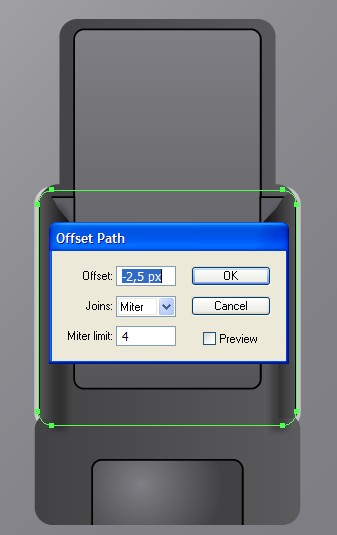
Now select the shape you sent behind the others, go to Object > Path > Offset Path, set the Offset to: -2,5px, click OK and change the color to black.
Step 27
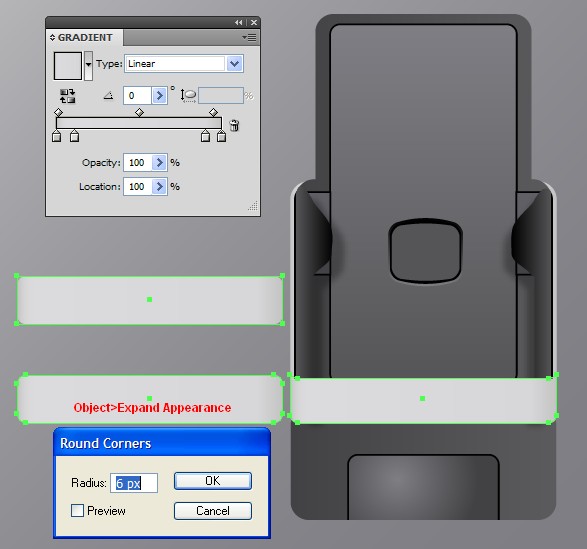
Create a rectangle as wide as the one in Step 24 (in this case 177px) and make the height 32px. Round the shape’s corners by going to Effect > Stylize > Round Corners, set the Radius to: 6px, click OK, go to Object > Expand Appearance and fill the shape with the gradient from Step 24. Move the shape into position and correct the top points of the rectangle, as shown below.
Step 28
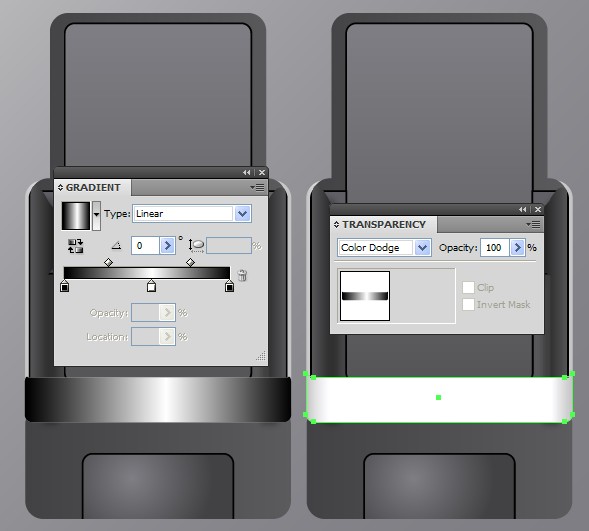
With the shape still selected, copy it using Control + C followed by Control + F and fill with a Linear Gradient, as shown below, and change the Blending Mode from Normal to Color Dodge.
Step 29
Now we need to place the Bluetooth device inside the cover. To do this, select the group with shapes of the Bluetooth and position the group between the shapes as shown in the picture below.

Conclusion
To finish your illustration, you can follow the instructions from a tutorial I’ve written previously to create a 3D effect. Experiment with different values in the Extrude & Bevel Options to find a result that you like. Below is a few different ways to show the device. I hope you’ve enjoyed this tut.
No comments:
Post a Comment